
Hello Friends, Here in this WordPress tutorial you can learn about how to use wordpress. Many people want to create a website using wordpress web application but don’t know how to use wordpress. So, this article is dedicated to them and they can read this complete wordpress tutorial article to learn wordpress website creation.
I have tried to cover almost all topics that will teach you how to use wordpress. So, kindly read this article till end to make this wordpress tutorial give fruitful results to me. Because my aim is to make my readers pro in using wordpress.
So, here we start…
How to use WordPress
Are you new on wordpress? and wondering how to use wordpress than stay tuned as I am going to share some basics of wordpress in this wordpress tutorial that you can learn to use wordpress.
I hope you know how to create a website using wordpress. I am going to share next steps here after installing wordpress how to use it. So, if you have created your own website than it’s good otherwise you can read my past work where I have discussed about how to make a website.
After installing wordpress application on your website. Now you need to follow these steps:
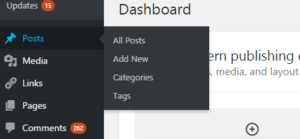
1. Login into your wordpress application by going on admin page it is generally www.domain.com/wp-admin/ or something like that.
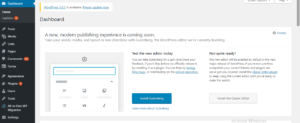
2. Now after you login you will reach to your dashboard of WordPress which seems like this:
How to Create a Web page using WordPress
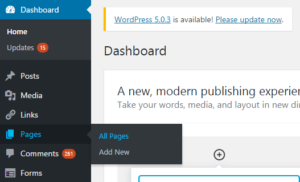
To create a web page using wordpress. Kindly click on Pages on your WordPress Dashboard. After clicking on pages click on new page or all pages.
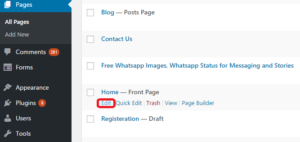
All pages shows the automatic created webpage according to your theme. You can edit or create new webpage. Here I am going to edit Homepage of my website.
After clicking on edit. A new webpage open like this:
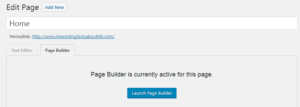
Here now you can either edit text or launch page builder to build your own web page.
I am going to build my own web page using drag and drop tool here. So I will click on Launch Page builder.
As I click on Launch Page Builder New Webpage opens like this:

Now I have 4 options to build my webpage that are on right side of page builder and are as follows:
How to use Row Layout in WordPress
To insert row. Just Click on it and drag and drop the columns that you want in a new row.
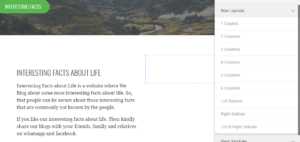
You can either add 1 column in row or 2 columns in row and till 6 columns in row as per your use.
You can use row to layout to add row in your webpage and then you can add text, button, image and click in that particular row elements.
How to use Basic Modules in WordPress
Now after adding row and column it’s time to place some elements over there. So, we will use basic modules to add text, image and music over the element space created by us.
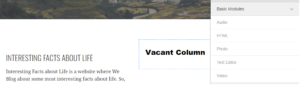
You can drag and drop the element that you want on created row or column space that is vacant. You can add audio, HTML, Photo, text and video over the space created by you using row module in wordpress.
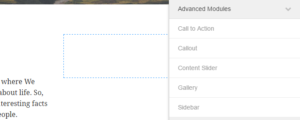
How to use Advance Modules in WordPress
Advance module provides you advance things that you can drag and drop on your webpage like:
- Call to Action
- Call Out
- Content Slider
- Gallery
- Slidebar
How to add WordPress Widgets on your Web page of WordPress Website
You can also add wordpress widgets on your web page of wordpress website by clicking on wordpress widget it bring many widgets in front of you that you can add on your wordpress website web page.
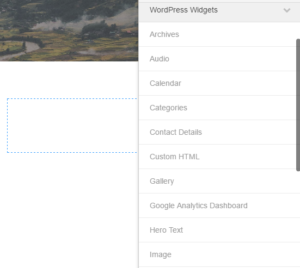
You can add wordpress widgets like:
- Archives
- Audio
- Calendar
- Categories
- Contact Details
- Custom HTML
- Galerry
- Google Analytics
- Hero Text
- Image
- Links
- Navigation Menu
- Ninja Forms
- RSS
- Recent Comments
- Recent Posts
- Search
- Social Profiles
- Tag Cloud
- Text
- Videos, etc.
It will display all wordpress widgets that you can add on your webpage. You can create a attractive webpage using this wordpress web page builder.
How to add new posts and post category on WordPress Website
To add a new post or article go to your wordpress website dashboard and click on posts.
You can check your all past previous post and edit them as well as add new post by selecting add new.
How to add a new Post category on WordPress Website
Categories shows you different post categories like you can make categories related to fashion, games, business ideas, education and movie reviews etc. A category consist all posts done in that particular category. So, you can create a new one for similar posts.
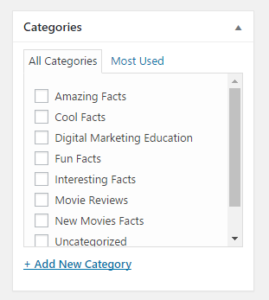
If you click on Category it will show you your previous created categories and will also ask for a new category to add.
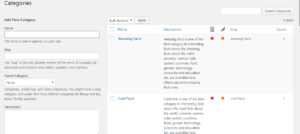
Here I have created few categories that are visible in right side whereas to add new category you can check the left screen that is displaying an option to add new category. Just add the category name, slug and description and click on add new category. If it is a new category then choose parent category otherwise you can also make a sub category under main category.
How to add New Post on WordPress Website
You can also add new post by clicking on Add New. It will show you a screen like below after clicking on add new:
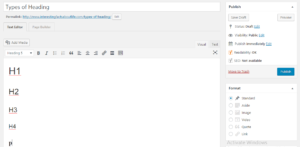
Write Title of New Post
Now here you can choose title of the article. As I have written types of heading in the title of article. It automatically creates permalink according to tile. You can also edit and create new permalink of your post.
Permalink of new post
Permalink is the link that can be used by website visitors to reach your post.
You can write post by using H1, H2, H3, H4, H5, H6 headings and paragraph. You just need to select the text type and start writing as shown in image above.
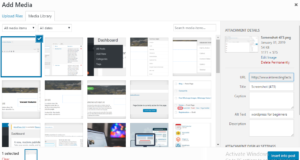
Add Media in New post
You can also add media like images, audio and video by clicking on add media.
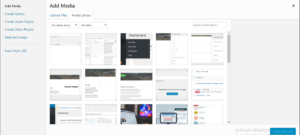
You can either use image from media library (Images added on your website) or can upload a new image. After choosing a image it asks for image tile, alt text, caption and description of the image that you can fill. It is good to use keywords in title, description, caption and alt text for which you want to rank on search engines.
Like If I am writing post on types of heading then if I am adding a image in my post than I would like to use title as “types of heading” and description like: This is the basic types of heading that are H1, H2, H3, H4, H5, H6 and P. Alt text and caption should also include the keywords for which you want to rank your post on search engine. This all comes in On Page SEO. On Page SEO covers many things like keyword density, article title, metra description, outbound links, inbound links, featured image, length of content and tags etc. That you can read in my article about how to write a SEO post.
You can use following features while writing a post:
- List
- Style of text
- Alignment
- Add and edit link in your post
Select Category of your post
Add Tags related to post and Add Ninja Form for Lead Generation
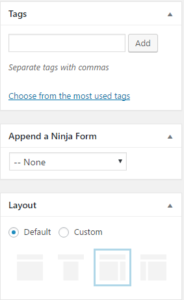
If I am writing post about How to use WordPress than I can use tags like WordPress Tutorial, WordPress Guide, How to create a website using WordPress and many more. Tags are separately visible on Search engines and are helpful to bring traffic on your post as that post is specifically tagged under those tags.
You can also add subscription form inside your written article for lead generation. Here I have ninja form installed on my wordpress application. So, I can add ninja form to collect leads.
Add Featured Image in your WordPress website post
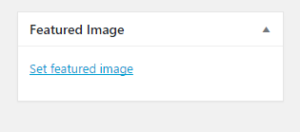
Featured image is the main image of your post that is visible as a cover image of that post on top of the post. So, it’s important top add featured image. You can use seo tips discussed above while adding featured image so that your post is highly search engine optimized post to gain higher search engine ranking positions.
Publish your Post
After writing the complete post and using all featured that you needed. It’s time to publish post. You can also save post as draft if it is incomplete and you want to complete it later otherwise you can publish it on your wordpress website.

Click on publish to publish the post.
To write a Highly search engine optimized post you can install some best seo plugins that displays result of your post whether it is SEO optimized or not and how is the readability of post. There are more chances of getting ranked in top search pages of google if you have written high seo post with good readability that will automatically attracts more visitors on your post through search engines.
How to add media in wordpress website
You can add media like audio, video and images in your wordpress website library by clicking on media.

How to add links in wordpress website
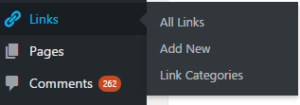
To add internal links and external links on your website you can click on links option. Links manage all internal links and external links of website that you can further use while designing a website. People hardly use this feature while creating a wordpress website.
Check comments on post of your own wordpress website
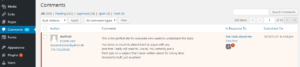
Comments section shows all comments made by people on your different posts of wordpress website. You can approve, disapprove, spam or delete comments posted by other on your posts according to you.
Create Subscription Form on your WordPress Website
You can add subscription forms on your wordpress website by using ninja forms that is pre installed plugin on your wordpress website. Subscription forms are helpful to collect deatils of subscribers of your website like name, email address, contact number and many more things.
To create a new subscription form click on forms.
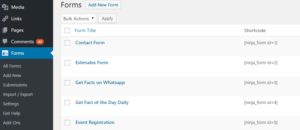
Now you can see options like:
- All forms: It displays all forms created by you. You can edit your past forms and can delete them.
- Add New: To add a new form.
- Submissions: Submission shows the submitted data by form fillers by individual formwise.
- Import/Export: By using this option you can import and export data in your submissions.
- Settings: It contains general settings of form that you can change as per your use.
- Add Ons: It contains add on features of this ninja form like connecting it with mailchimp for email marketing and many more add on functions that you can install in your ninja forms plugin.
Short code is the form code that you can copy and paste while writing your post in between and it automatically displays the form in between post when visitiors visits your post at the same location where you have pasted the short code of a particular form.
How to Add a new form using Ninja Forms on Website
To add a new form click on add new in forms.

You can add different forms like contact form, quote request or any event registration form. Here in this wordpress tutorial I am going to tell you how to create an event registration form. Either click on + or Event Registration.
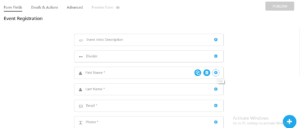
Now you can edit, delete or add new form fields according to your choice. To add new form fields you can simply click on +. To delete any form field click on trash icon. You can also move form fields up and down.
Emails and Actions of a New Form:
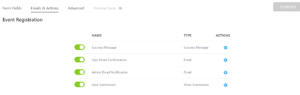
In emails and actions of a new form you can edit email actions like:
- Success Message: It shows successful message as visitor completes the form filling process.
- User Email Confirmation: It will confirm the email address provided by form filler. If it is turned on then it will send an automatic mail by the provided email address in your ninja form to the user who filled the form. As form filler gets the email after filling the form. The Email Address provided by filler is verified.
- Admin Email Notification: This feature notifies admin by sending a mail on every new registration on form.
- Save Submission: It saves the submitted data by the form filler.
You can also preview form by clicking on preview option and you can change the form name by clicking on advanced option.
Change Appearance of your WordPress Website
To change appearance of wordpress website click on appearance option on your left side of wordpress dashboard.
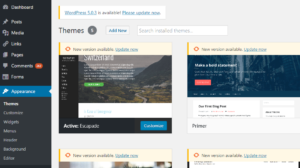
Here you will see variety of options related to appearance like:
- Themes: This option shows the pre installed themes. You can change, delete and add new themes on your wordpress website from here.
- Customize: You can adjust color schems and font etc things from customize option.
- Widgets: This option is used to manage widgets like calender, froms and real time visitors etc.
- Menus: You can add primary menu, secondary menu and footer menu on your website and can manage their locations through it.
- Header: It is used to manage header part of your website. Sometimes their is need to place specific codes in header. So, you can use this option to paste those codes as well.
- Background: To change background of your wordpress website. You can use this appearance feature.
Install Plugins on your WordPress Website
To install plugins on your wordpress website you can use plugins option by clicking on it. Plugins are useful to add multiple web applications on your website like chat plugin, seo plugin, analytics plugin, security plugin, subscription form plugin, social share plugin and many more.
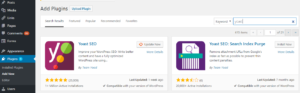
Some Basic plugins to be installed while you create a wordpress website
- Google Analytics
- Yoast SEO
Add Users on your WordPress Website
You can check users, add users and remove users by going on users option in wordpress dashboard. Users shows administrator, subscriber, seo manager, seo editor and other profiles related to users of your website.
Settings of WordPress Website
This includes all kind of settings of a wordpress website like following:
- General Settings: It includes website url, date and time format, time zone and site language.
- Permalinks: Various types of permalinks that you can use for your wordpress website are here. For example: Plain, day and name, month and name, post name, numeric and custom link style that you can use for your website.
- Insert headers and footers: You can add anything in your header and footer by using this option like any widget or contact details etc. can be used to add in header and footer section of website.
- Limit Login Attempts: You can put login attempt limits like “3”. If any user enters incorrect username or password for 3 times than he/she can’t login until he/she verify their email account on your website.
WordPress Tutorial for beginners
This wordpress tutorial can be used by beginners also to create a wordpress website. I hope you liked our this wordpress tutorial. You can read our more articles to create an effective wordpress website.